
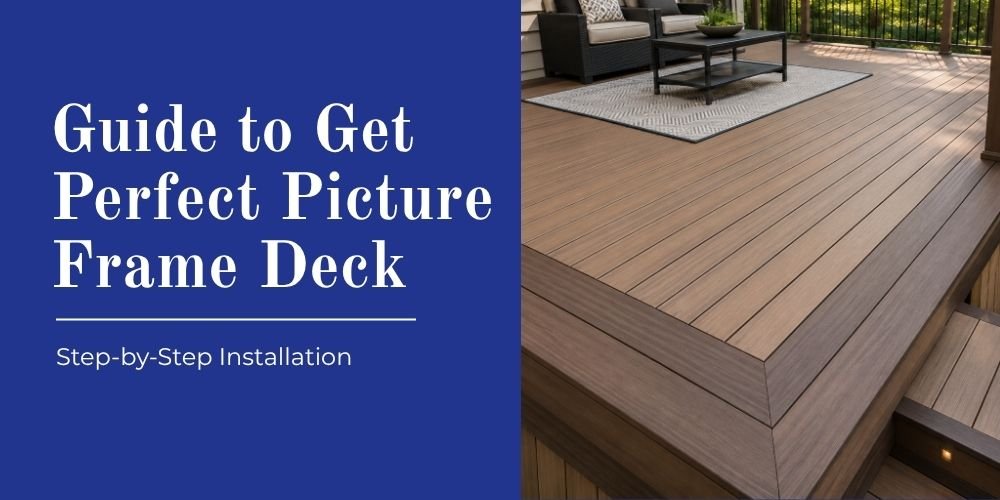
You’ve seen it on decks that just look finished. That clean border running the perimeter makes the whole surface look intentional, polished, and built with purpose. That’s picture frame decking. And if you’re planning a new deck or upgrading an existing one, adding a picture frame border is one of the highest-impact moves you can make without blowing your budget.
But here’s what most tutorials won’t tell you: picture framing looks simple, but it’s one of the most mistake-prone parts of any deck build. Get the blocking wrong, misjudge your post placement, or rush the layout, and you’re ripping boards out and starting over.
This guide covers the entire installation the right way for both composite and wood decking. Whether you’re DIYing it or just want to know what your contractor should be doing, let’s get into it.
What Is a Picture Frame Deck?
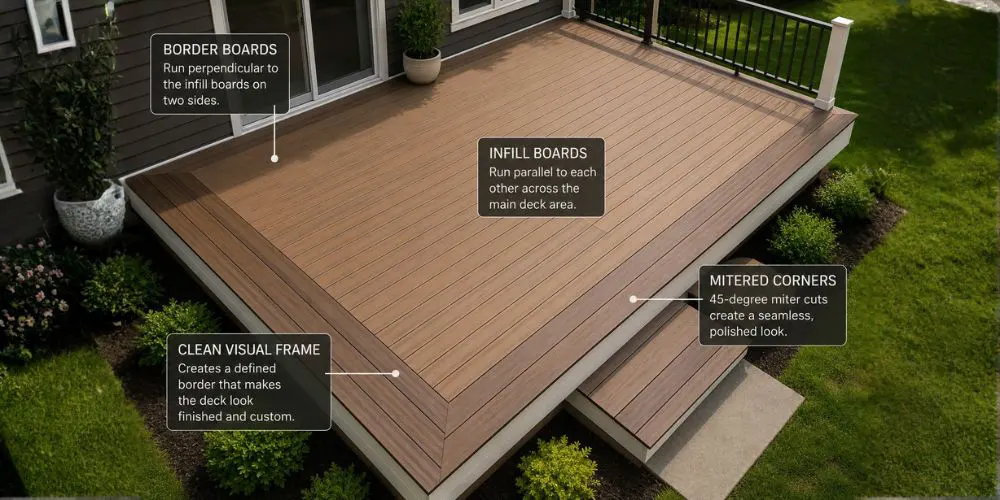
A picture frame deck has a border board or multiple border boards running along the perimeter, framing the main deck surfaces the way a frame surrounds a painting. The border boards run perpendicular to the infill boards on two sides, creating a clean visual boundary around the entire deck.
It’s also called a breadboard border or perimeter board installation. Beyond the aesthetics, it serves a real purpose: it hides the cut ends of your infill boards, eliminates butt joints near the perimeter, and the slight overhang helps keep debris out of the gap between decking and fascia.
Tools and Materials Checklist
Materials:
- Square-edge border boards (NOT grooved, explained below)
- Infill deck boards
- Extra joists and blocking lumber (2×6 or 2×8)
- Joist hangers and structural angle brackets
- Joist flashing tape
- Color-matched composite screws or plug system (composite)
- Stainless steel screws (hardwood)
Tools:
- Corded power miter saw (fine-tooth carbide blade)
- Corded circular saw (60-tooth minimum)
- Jigsaw (for post notching)
- Cordless drill and impact driver
- Chalk line, speed square, measuring tape
- Bar clamps and an oscillating multi-tool
Important: Never use a cordless saw on composite decking. The slower blade speed tears the material instead of cutting it clean. Always corded, always the right blade.
Step 1: Plan Your Layout First
This is the step most people rush, and the one that causes the most rework. If you haven’t already, read through our deck design tips guide before starting. Proper planning upfront saves hours on the build.
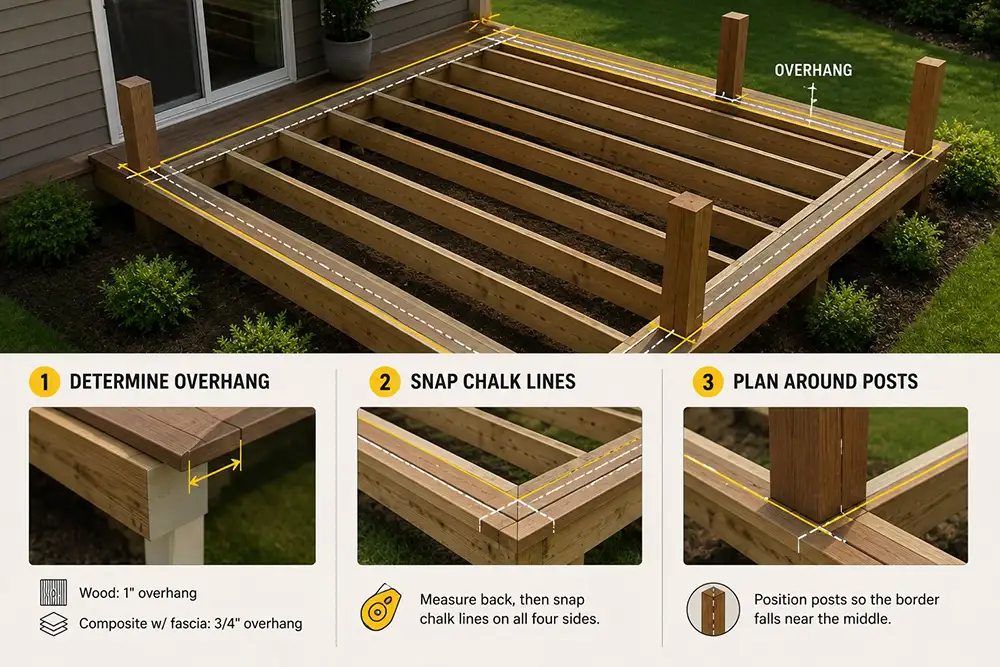
Determine your overhang.
The border board needs to overhang the outside of the deck frame slightly:
- Wood decking: 1 inch overhang past the outside face of the framing
- Composite with fascia installed: approximately 3/4 inch (fascia is typically 1/2″ thick, leaving a 1/4″ reveal)
Snap your chalk lines.
At each corner, measure back from the outside of your framing the width of your border board minus your overhang. For a 5-1/2″ board with a 1″ overhang, measure back 4-1/2″ from the outside face. Do this at all four corners, then snap chalk lines connecting them. This is your border board’s inside edge line, and the most important measurement on the entire deck.
Plan around your railing posts.
Railing posts sit just inside the deck framing, right in the path of your border boards. Before snapping a single chalk line, figure out exactly where every post lands relative to your planned border line. For more on post planning and railing requirements, check out deck railing height guide.
The ideal scenario: the border falls roughly halfway across the post width, letting you notch both the border board and the adjacent infill board cleanly.
The worst-case scenario: a post lands entirely within the border board width, requiring you to cut a full hole in the center of the board. It gets even harder when multiple posts are involved on the same board.
Plan post locations before finalizing your border line. A small adjustment during framing saves hours during decking.
Step 2: Add the Blocking
This is the most important structural step and the biggest difference between a picture frame build and a standard deck build.
Why extra blocking is required.
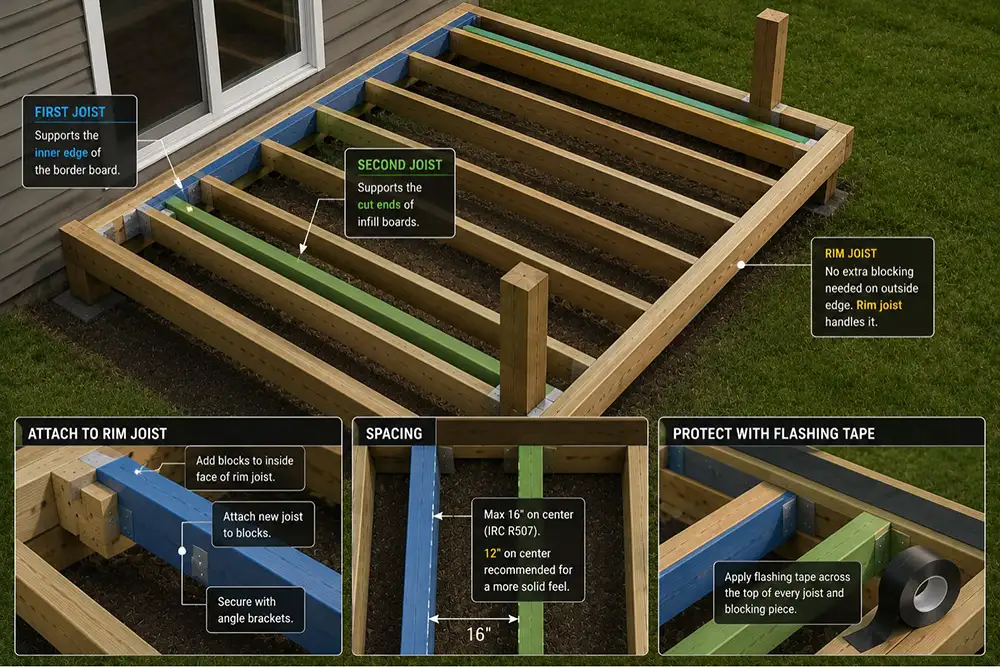
Border boards run parallel to the joists on two sides of the deck. Without extra blocking underneath them, those boards have nothing solid to fasten to. They’ll flex, squeak, and fail. You need two additional joists on each side where the border runs parallel to the framing:
- First joist: supports the inner edge of the border board
- Second joist: supports the cut ends of your infill boards
No extra blocking is needed on the outside edge. Your existing rim joist handles that.
Install the first joist.
Position it so its center sits approximately 1 inch in from the inner edge of your planned border board. Because it sits close to the existing outside joist, standard joist hangers won’t fit on both sides. Fix this by fastening blocks along the inside face of the existing joist, then attaching the new joist to those blocks. Secure both ends with structural angle brackets.
Install the second joist.
Position it so its center sits approximately 1 inch in from where your infill board ends will land. For a double border, run both blocking joists side by side and fasten them together.
Spacing: According to the International Residential Code (IRC) Section R507, deck joists and blocking must be spaced at a maximum of 16 inches on center for standard residential deck builds. For a more rigid, solid feel underfoot, 12 inches on center is the preferred spacing for picture frame installations specifically.
Protect all framing with flashing tape.
Run joist flashing tape across the top of every joist and blocking piece. This matters more than most builders acknowledge. According to the USDA Forest Products Laboratory, wood decay is caused by fungi that thrive when wood moisture content stays above 19%. Flashing tape creates a moisture barrier on joist tops, the most water-exposed part of the substructure, and seals around fastener penetrations where water would otherwise enter the wood directly. In San Antonio’s climate, where heat and rain cycles are intense, this single step significantly extends the life of your substructure.
Step 3: Install the Border Boards
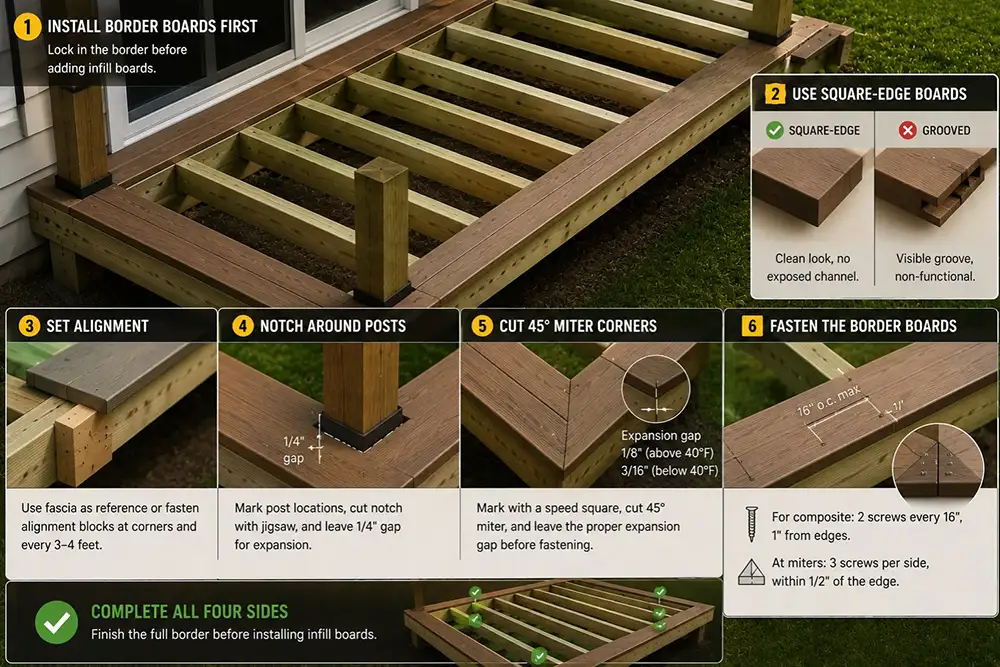
nstall border boards before infill boards. It’s much easier to achieve precise spacing between the border and the first infill board when the border is already locked in place.
Always use square-edge boards, not grooved.
Grooved boards are designed for hidden fastener clips inserted into the groove channel. Your border board has one exposed inner edge facing the infill boards. A groove on that edge is visible and non-functional. Square-edge boards allow clean face-fastening or a plug system without an exposed channel showing. This is the most common material mistake on picture frame builds.
Set your alignment.
If fascia is already installed, use it as your reference guide for consistent overhang. If not, cut temporary alignment blocks from scrap lumber and fasten them to the joist tops at corners and every 3 to 4 feet in between.
Notch around railing posts.
Do this before cutting your miters. It’s far easier on a board that’s still long. Set the border board in position against the posts, mark the post locations, measure the notch depth, and cut with a jigsaw. Add 1/4″ of clearance around each post for expansion. This gap gets covered by post base trim.
Cut your 45-degree miter corners.
Slide the board into position and mark the miter location with a speed square. Before cutting, set your expansion gap at the miter joint. The North American Deck and Railing Association (NADRA) recommends the following temperature-based gap specs for composite decking installations:
- Above 40°F at time of installation: leave a 1/8″ gap at each miter
- Below 40°F at time of installation: leave a 3/16″ gap at each miter
Composite decking can expand and contract by as much as 1/8 inch per 10 feet of board length across seasonal temperature swings. Skip the gap and your miters will buckle visibly in summer heat.
Fasten the border boards.
For composite: predrill and install two fasteners every 16 inches, about 1 inch from each edge. Use color-matched screws or a plug system. At miter corners, place three fasteners evenly spaced on each side of the miter within 1/2 inch of the edge.
For hardwood: use stainless steel screws only. The USDA Forest Products Laboratory notes that high-tannin hardwoods like Ipe, Cumaru, and similar tropical species cause accelerated corrosion in standard zinc or galvanized fasteners through a chemical reaction between the wood’s natural tannins and the metal coating. Over time, this causes fastener failure and dark staining streaks across the board face. Type 304 or 316 stainless steel fasteners are the correct choice for any hardwood decking application. Pre-drill oversized holes, slightly larger than the screw shank, to allow for wood movement.
Install all four sides of the border before moving to infill.
Step 4: Install the Infill Deck Boards
Start from the outside, work toward the house.
Install the first infill board at the outer edge, nearest the border. If the last board needs to be ripped to a narrower width, the cut edge ends up against the house wall, where it’s hidden by flashing or trim.
Maintain consistent spacing.
For composite: use the same temperature-based gap rules as the miters. For hardwood: standard 1/8″ gap between boards throughout. The first infill board needs to be face-fastened on the side closest to the border since there’s no room for hidden fasteners on that edge. Plug the screw holes for a clean look.
Snap a chalk line every 4 to 5 rows.
On any deck longer than 12 feet, don’t trust your eye to keep rows straight. A chalk line reference every few rows takes 30 seconds and prevents discovering a drift at row 15.
Measure before you cut a full stack.
Before cutting all your infill boards to the same length, check that the space between your parallel border boards is consistent at multiple points. Even on a well-built deck, lumber moves. If the measurement varies, cut boards individually. It’s tedious, but it’s the professional approach.
Rip and install the last board.
Measure the remaining space, account for your expansion gap, and rip the last board to width. Face-screw on the house side and plug the holes.
Step 5: Make the Final Cuts
If you ran your infill boards intentionally long on the open side, now is when you finish it.
Snap a chalk line between the two short-point corners of your border on the open side. Run a circular saw with a straightedge guide along this line. The previously cut first and last boards give you clean stopping points so your saw doesn’t clip finished corners.
Cut and fit the last border piece on the open side. Measure long-point to long-point, go slightly long on your first cut, mark and cut post notches, test-fit, make final adjustments, then push tight and fasten.
That’s a picture-framed deck.
Wood vs. Composite: Key Installation Differences
Choosing between wood and composite affects more than just aesthetics. It changes how you cut, fasten, and gap the boards. For a deeper look at both materials, our composite vs. wood decking comparison and best decking materials guide cover it in full. For installation specifically:
| Factor | Wood | Composite |
| Saw type | Corded or cordless | Corded only |
| Pre-drilling | Always required | Varies by brand |
| Fasteners | Stainless steel only | Color-matched screws or plugs |
| Miter gaps | Standard 1/8″ | Temperature-dependent (1/8″ or 3/16″) |
| Post notching | Standard jigsaw | Jigsaw, clean cuts essential |
If you’re comparing composite brands, our Trex vs. Deckorators comparison breaks down which performs better for border installations.
Common Mistakes to Avoid
Using grooved boards for the border.
The most common material mistake. Grooved boards leave a visible channel on the exposed inner edge. Always use square-edge for border boards regardless of what your infill boards are.
Skipping the extra blocking.
The second most common mistake. Without proper blocking joists under the border boards, you’ll have flex, squeaks, and fastener problems within a season.
Not planning post locations before snapping your border line.
Discover a post lands dead-center in your border board after you’ve already started installing, and you’ll understand why this step matters. Plan it first.
Cutting all infill boards to the same length before measuring.
Decks are rarely perfectly square over their full length. Measure each board or verify consistency before cutting a whole stack.
Ignoring temperature-based expansion gaps at miters.
Composite decking moves. A tight miter installed in cool weather that buckles in summer heat is a visible, embarrassing failure. Follow the gap specs.
Not protecting joist tops with flashing tape.
This is an invisible detail that extends your deck’s life by years. Moisture sitting on unprotected lumber tops is one of the leading causes of early structural rot.
Using cordless saws on composite.
The slow blade speed tears and melts the material. Always corded, always right blade.
FAQs
Do I need extra joists to picture frame a deck?
Yes. On the two sides where border boards run parallel to existing joists, you need two additional joists per side: one under the border board’s inner edge, and one under the infill board ends.
Can I use grooved boards for the border?
No. Border boards must be square-edge. The inner edge is exposed and a groove on that edge is both visible and non-functional.
Does picture frame decking cost more?
Yes, typically 10 to 20% more than a standard deck of the same size. According to Angi’s deck cost research, picture frame borders add cost through extra blocking lumber, additional border board material, miter cut labor, and increased installation time. The exact premium depends on single, double, or triple border and your choice of materials.
Can I add picture framing to an existing deck?
Yes, but you’ll need to remove the outer rows of deck boards to access the framing and add blocking joists. On decks in good structural condition it’s a straightforward upgrade. On older decks, have the substructure assessed first.
What angle are the corner cuts?
45 degrees at each corner, with the appropriate expansion gap left at the joint before fastening.
Build It Right With French’s Custom Outdoor Concepts
Picture framing is one of the best upgrades you can make to a deck when it’s done right. The blocking, miter cuts, post notching, and material-specific details add up fast, and the difference between a professional install and a rushed one shows every single day.
French’s Custom Outdoor Concepts builds custom decks, composite and hardwood, across San Antonio and the surrounding area. We’re TrexPro and Deckorators certified, and picture frame borders are a regular part of our custom deck builds.